F.A.Q.'s and How-To's
How can I add a buyer fee to a vehicle in my inventory?
Go to Inventory > Reconditioning. Choose the vendor you will be paying using the blue arrow next to "Vendor Name". Enter the invoice date, number, and amount under Invoice Information. Hit "Tab" or "Enter" on your keyboard to continue.
Use the blue arrow on line 1 to select the stock # of the vehicle to which you are posting the fee. On line 5, select account 51026 - Buyer Fee. Enter a description on line 6, and select the invoice due date on line 7. Then click "Save".
The fee will be included in the vehicle's reconditioning costs, and the system will generate a payable owed to the associated vendor.
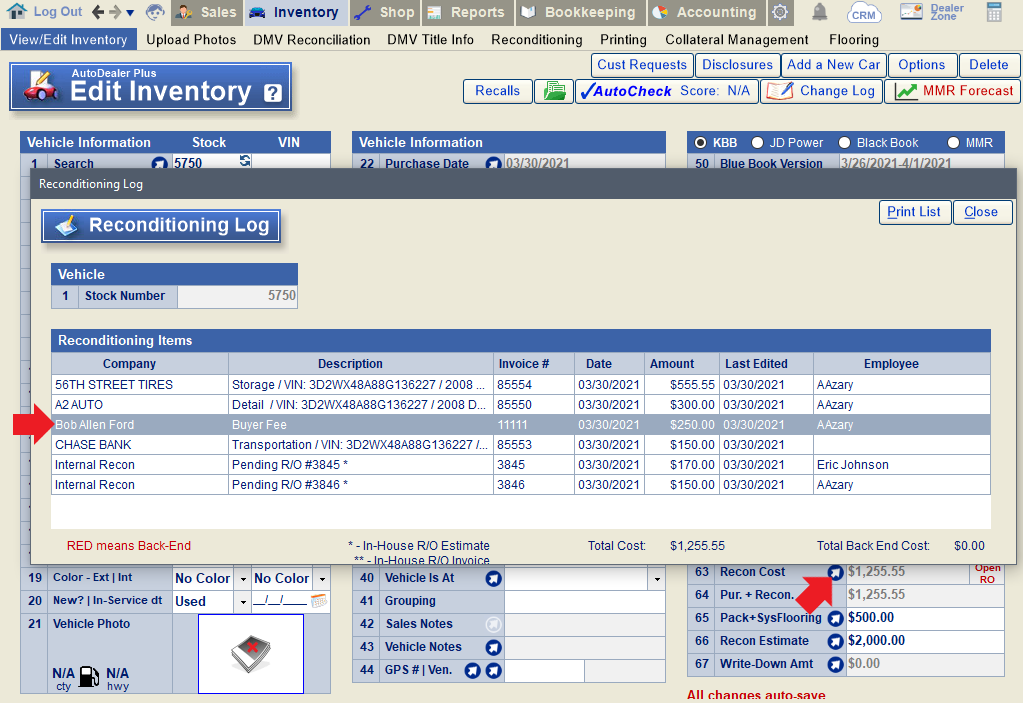
Fee shown in vehicle reconditioning log.
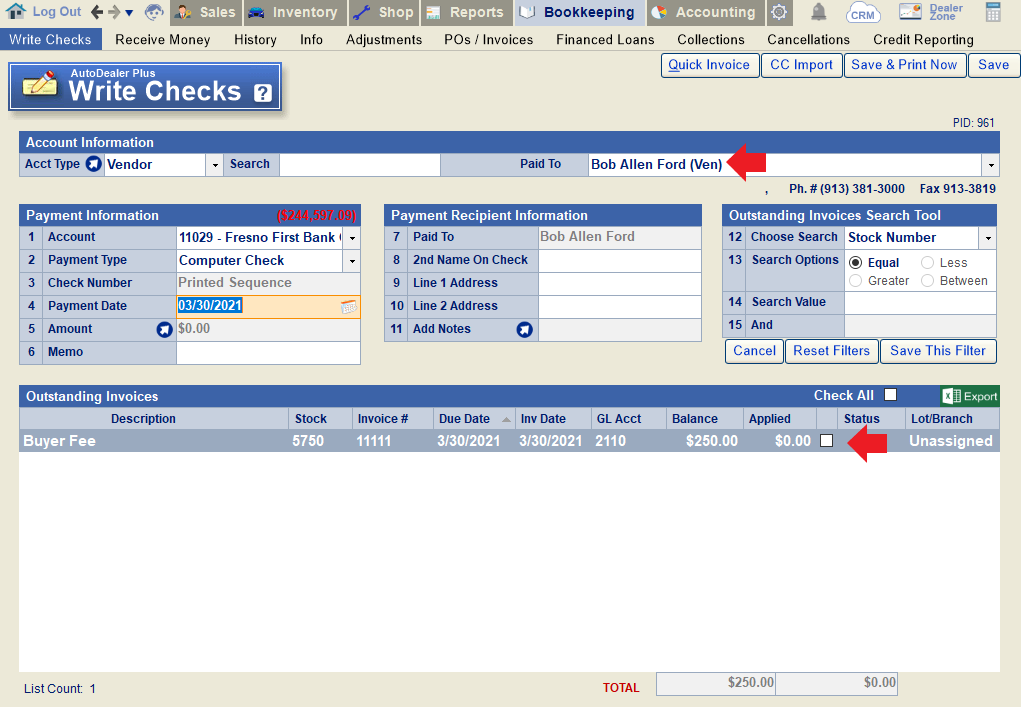
The system creates a payable to the associated vendor.
How can I add a new body style options for RVs or Commercial Trucks on line 17 of the Inventory screen?
How can I add a new vehicle disclosure?
How can I add a vehicle with a VIN that's less than 17 digits?
How can I add custom color options for vehicle listings?
In Inventory, click on Settings (gear icon) >Click the "Models, Styles, Colors" selection.

Color options can be added or removed from the "Available Colors" list on the right-hand side of the popup. Changes will take effect upon your next login.
How can I add, edit, or delete vehicle purchase vendors?
To Add a Purchase Vendor:
In Inventory > View/Edit Inventory, click "Add a New Car". Click the blue arrow on line 2 of the New Car Invoice popup to add a new purchase vendor name.
To Edit or Delete a Purchase Vendor:
Go to Settings (gear icon) > Client Setup. Choose Acct Type - Vendor and load the vendor you wish to make changes to. Vendor information can be edited on this screen. If you wish to delete the vendor, use the "delete" button on the top-right corner. Note: A vendor can only be deleted if it does not have any associated accounting transactions.
All changes are saved automatically.
How can I adjust the printing alignment of the DMV 262 for off-the-street purchases? (CA Dealers)
How can I change our default PACK?
How can I change the ACV of a trade-in vehicle after a deal is tripped or finalized?
To change the actual cash value of a trade-in, you'll need to load the original sale through which the vehicle was acquired. You can quickly do this by loading the trade in the View/Edit Inventory screen and clicking the blue arrow on line 30 to open the Deal screen.
Open the trade worksheet using the blue arrow on line 11 of the Deal screen. Change the ACV on line 3 as desired. Then, re-save the deal to save your changes.
If the sale is locked, you will need to unlock it before you can make any changes.
To do this, go to Sales > Recap and click "Unlock Sale".
You can then adjust the trade ACV on the Deal screen using the method described above, or by clicking the blue arrow on line 6 of the Recap screen. Be sure to re-save the deal and re-lock the sale once you're done.
Note: If the trade loss on line 6 is "$0", the arrow will be inactive. In this case, you will need to use the Deal screen to change the trade ACV.
Once the trade is refreshed on the View/Edit Inventory screen, the trade cost on line 61 will reflect the new ACV.
Note that changing the ACV of a trade will affect the profit of the deal through which the trade was acquired.
How can I change the sequence of stock numbers being used for newly stocked vehicles or trade-ins?
When new vehicles are stocked into inventory, the system assigns the next available stock number in sequence by default. To change this sequence, you can enter a new starting stock number in your system defaults.
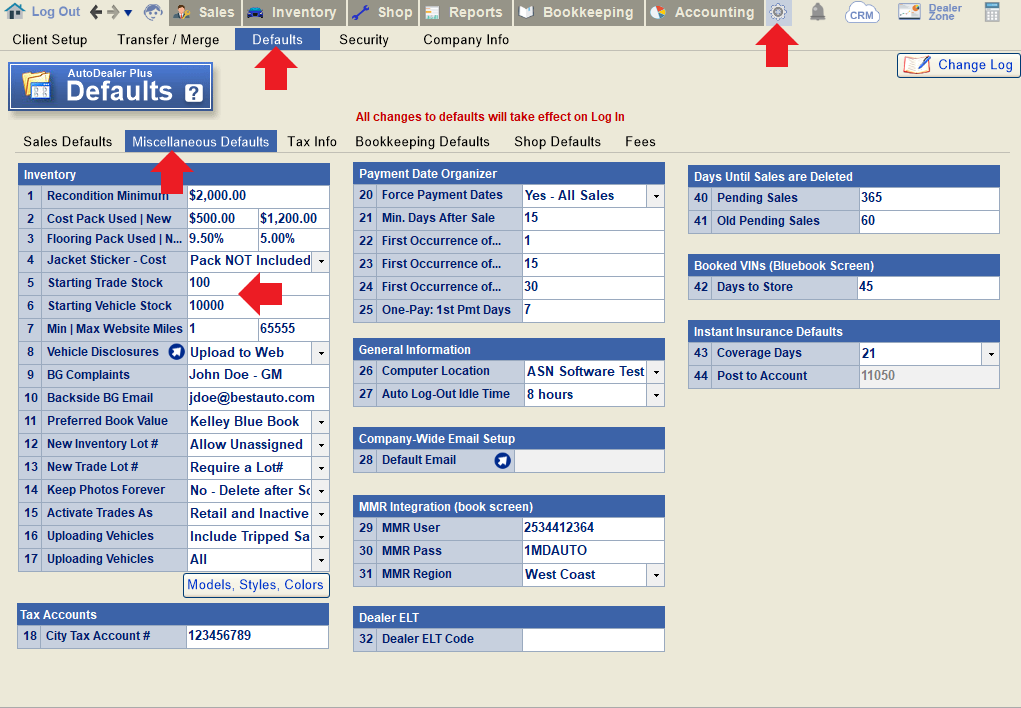
Go to Settings (gear icon) > Defaults > Miscellaneous Defaults.
For trade-ins, entered your desired starting stock number on line 5. For regular inventory, enter the starting stock number on line 6. If you do not wish to differentiate between the sequence for trade ins versus general purchases, you can set both lines to the same #.
In the example below, the next trade-in stocked will be assigned stock #100, and the next general purchase vehicle stocked will be assigned stock#10000, assuming neither of these stock numbers have been used before.
Dealers with multiple lots will need to assign starting stock numbers per lot. To do this, follow the steps above for your current lot, and then switch your computer location using these instructions. Restart the program, and follow the steps above once again to adjust the starting stock numbers at the next lot. Repeat as needed until all lots' settings have been adjusted. Remember to change your computer location back to the correct lot once you're done.
How can I correct the vehicle details for a VIN that is not decoding correctly?
If a vehicle does not decode at all, or decodes with incorrect information, you should first attempt to correct the issue by following the steps in this FAQ.
Most VIN decoding issues can be corrected, but if often takes weeks for these types of tickets to be resolved. In the meantime, you can follow these instructions to correct the vehicle details on your Inventory screen. Please note that following these steps will remove any book values assigned to the vehicle, as book values are only available for system-decoded VINs.
Step One: Un-decode the VIN
Use the blue arrow pointing down on line 4 to un-decode the vehicle's VIN. Confirm that you would like to un-decode the VIN if prompted.
Step Two: Manually Input Vehicle Details
You can then select the correct make from the dropdown on line 6 and type in the correct model and submodel. You can also select from the dropdown options for the engine, transmission, and drivetrain on lines 10-12.
Alternatively, you can add custom make, model, and submodel options that will appear in the dropdowns on lines 6-8. This is particularly useful for certain types of vehicles you may stock often that are not automatically decodable. To do this, go to Edit Inventory tab. click on (gear icon) and select first item on the list "Setup Model, Styles and Color'.
Makes, models, and submodels can be added, edited or removed from this popup. Note that you must select a make before adding a corresponding model, and then must select a model before adding a corresponding submodel. In this example, "Chevrolet" was selected in the list of makes, and then "Malibu" was added as a model option, followed by "Sedan 4D" as a submodel option.
If you then return to the Inventory screen and un-decode the VIN on line 4, you will be able to select from the custom drop-down options you just created for make, model, and submodel.
How can I get a list of vehicles in inventory that do NOT have photos?
How can I print a Bill of Sale or other private sale forms for a consignment or Off-the-Street Purchase?
First, when adding the vehicle into your inventory, be sure to pick "Off-the-Street Purchase" or "Consignment" for the Purchase Type on line 1. Fill in the remaining purchase details and click "save".
Note: For instructions on adding a new vehicle into inventory, click here. If you have already added the car and need to edit the purchase type, click here.
Once you've saved the purchase information, the system will display a list of Private Sale Forms available to print.
You can always access these forms at a later time by loading the vehicle in the Inventory screen and clicking the blue arrow next to the Purchase Cost on line 61.
How can I see a list of all vehicles that were deleted from inventory?
How can I track changes in the book value of my inventory?
You can track the appreciation or depreciation trend for inventory value since it changes weekly and could impact your inventory portfolio as an asset. This knowledge should assist you in maximizing profit and minimizing losses if the market value drops for any reason.
Go to Report > Custom Report and select 'Unsold Vehicles' as the report source. Choose any inventory fields you wish and add guide value fields. For instance, if you are a Blue Book user, select the current KBB version, Wholesale Value, 1-week-old value, or 2-week-old value, as shown in this example. Additionally, you can add new fields using 'Custom Formulas,' such as 'Last Week's Value—Current Value'.
If you subscribe to multiple guidebooks, you can add them to your report or customize a report for each guide.
How can I undo a sale with a trade and keep the trade in inventory?
In Sales > Deal, load the sale in question and click "Undo Sale".
Choose the Undo Date on line 1 and the Reason for Undo on line 3. On line 4, select "Do Not Remove Trade". The system will ask you to confirm that you want to keep the trade. Click "Yes" to continue.
Click "Undo Sale to Pending" and then click "Yes" to confirm.
The trade is now removed from the sale entirely. If you load the trade vehicle in the inventory screen, you'll see that it is marked as a general purchase. If you click the arrow on line 61 (Purchase Cost) of the Inventory screen and edit the vehicle purchase, you'll see that line 7 of the popup has a note that the vehicle was a trade from a deleted sale.
If you load the "General Purchases" vendor in the Write Checks screen, you'll see a payable for the cost of the trade, including any balance owed to the lienholder as well as the net trade value owed to the customer.
How can I view a list of all my inventory?
How do I access the ASN Apps on my mobile device?
How do I add a new vehicle to my inventory?
Go to Inventory > View/Edit Inventory. Click "Add a New Car".
Choose the Purchase Type on line 1 and then fill out the remaining fields. Once all required fields have been entered, you will be able to click "Save".
Note: If "Consignment" or "Deferred Purchase" is selected for the purchase type, the purchase transaction will not post to accounting until after the unit has been tripped.
How do I add a third trade-in to a deal?
Because most sales contracts only allot space for two trades, the deal screen will only allow you to add two trade-in vehicles to a sale. In the event that a customer has three trade-ins, here is the process we recommend following:
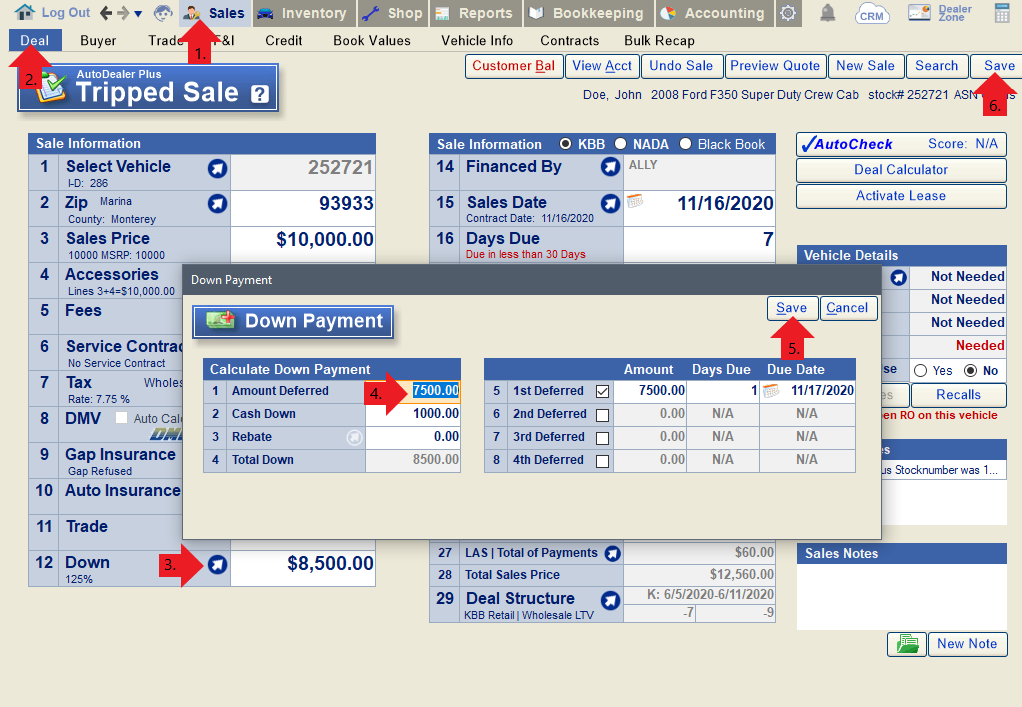
1. Add a deferred down payment to the deal, equaling the net value of the third trade. You can do this by opening the Down Payment popup on line 12 of the Deal screen. In this case, we are assuming the third trade-in has a net value of $7500.
2. Stock in the third trade-in as an off-the street purchase on the Inventory screen. Enter the VIN and other necessary vehicle information on lines 5-8. Enter the trade value as the purchase amount on line 14. Enter the trade owner's information in lines 20-24. Enter the lien amount (if any) on line 25 and select the lienholder on line 26.
Once the purchase is saved, the system will automatically calculate the net trade value (invoice balance owed to the customer) on line 15. You can also print documents for the purchase of the trade-in from this window.
3. Clear the payable for the third trade and the receivable for the deferred down (these should be equal amounts) using the clearance account. Add a memo to both transactions to signify why the clearance account was used.
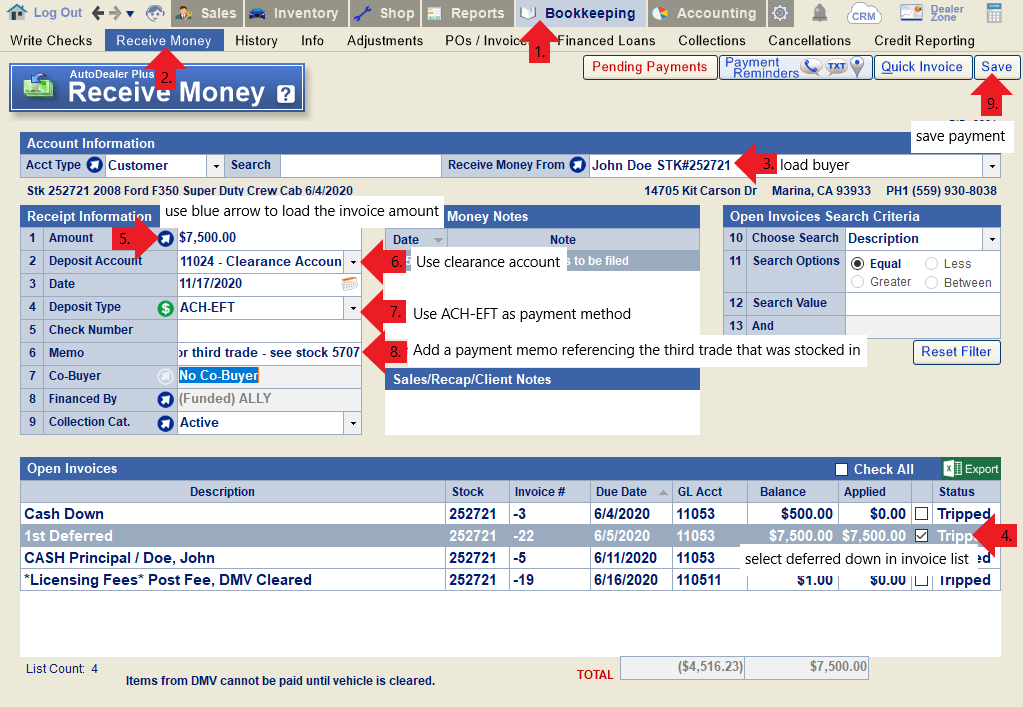
Clear the receivable for the deferred down.
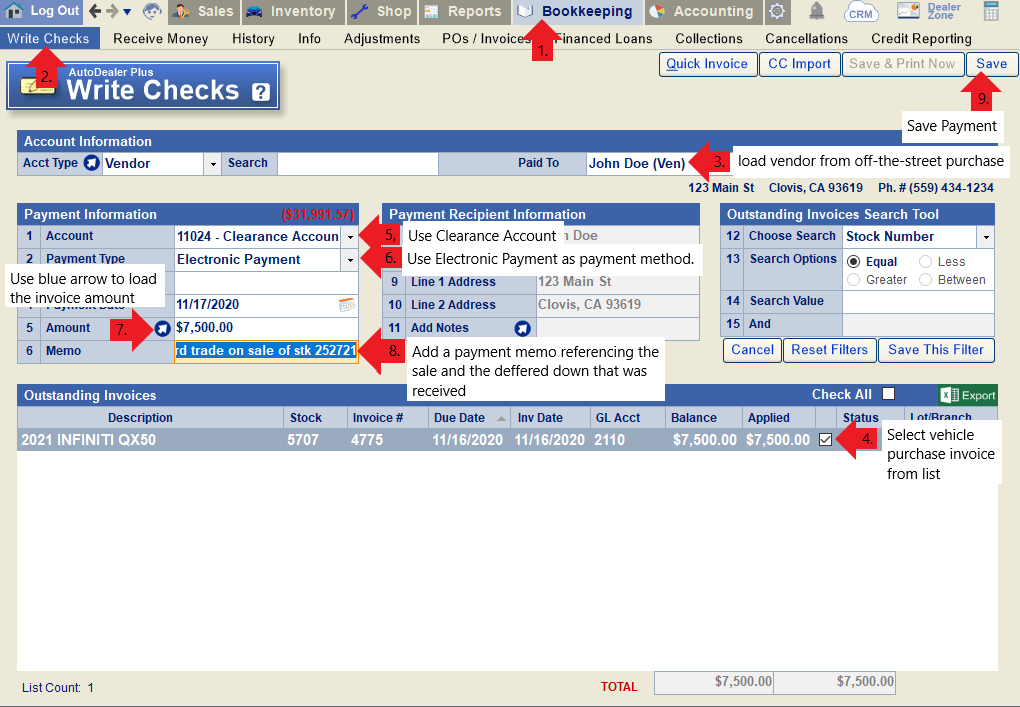
Clear the payable for the purchase of the third trade.
How do I add an "Unassigned" Lot for inventory?
How do I change a vehicle's stock number?
Load the vehicle in the Inventory screen and click the blue arrow next to line 22 (Purchase Date). Click "Yes" when prompted.
Note: If the arrow is greyed out, this means that your security settings are not set up to allow you to change stock numbers. Your administrator will need to change this for you.
Enter the new stock number and click "Ok".
How do I correct a vehicle that was assigned to the wrong state when it was stocked in?
How do I correct a VIN that was inputted incorrectly?
How do I delete a vehicle from my inventory?
When a vehicle is loaded on the Inventory screen, you can press the "delete" button on the top-right to delete it from inventory. This will ONLY work if there are no transactions associated with the vehicle.
If there are transactions associated with the vehicle, you will need to remove them first. There are 3 possible things you may need to do:
1. Remove the purchase cost. To do this, click the arrow button next to the Purchase Cost on line 61. This will open the New Car Invoice popup. Change the purchase amount on line 14 to "0" and click "save".
2. Clear the reconditioning. To do this, click the arrow button next to the "Recon Cost" on line 63 to open the Reconditioning Log. Right-click on a line item to edit it. You can then zero out the amount, void it, or re-assign it to another stock number.
3. Remove any other transactions associated with the vehicle. If you have completed the previous two steps and the system still alerts you that there are transactions to void before the vehicle can be deleted, you will need to use the Ledger to locate any remaining transactions associated with the stock number. Go to Accounting > Ledger and filter by the stock number. You can right-click a line item to zero out or void these transactions, or re-assign them to another stock number, as described above for recon items.
At this point, you should be able to return to the Edit Inventory screen and delete the vehicle. If for some reason you could not void/remove all of the associated transactions, you can dispose the vehicle instead.
How do I dispose a vehicle?
How do I edit the purchase information for a vehicle (purchase cost, purchase date, purchase vendor, etc.)?
Load the vehicle in the Inventory screen. Click on the blue arrow on line 61 (Purchase Cost) to edit the purchase information. Click "Yes" when prompted to edit the purchase transaction.
Edit any necessary information and click "save".
Note: If you need to edit the purchase amount for the vehicle and line 14 is greyed out, the transaction was most likely recorded as a Quick Payment Entry when the vehicle was stocked. See this FAQ for details on how to edit the transaction in this scenario.
How do I edit the purchase transaction for a vehicle purchase that was entered as a quick payment entry?
When a vehicle purchase is inputted as a quick payment entry (via manual check) at the time the vehicle is added to your inventory, you will see the check details in the History screen for the purchase vendor but will not be able to edit the transaction from the History screen. The purchase amount listed on line 14 of the New Car Invoice popup (in the Inventory screen) will also be greyed out.

Check info is recorded, but only check # and memo can be edited here.
Instead, you will need to load the vehicle in the Inventory screen and edit the purchase transaction by clicking the blue arrow on line 61.
Change line 16 to "No" to remove the quick payment entry. Since you are now recording that the vehicle has not yet been paid for, you will need to select a liability account (typically 2110) on line 13. Click the "save" button to save your changes.
If you re-open the popup on line 61, you will now see that you can edit the purchase amount if needed.
If you load the Write Checks screen for the purchase vendor (you easily do this by clicking the arrow on line 23 of the Edit Inventory screen), you will see a new payable to the vendor for the purchase cost of the vehicle. At this point you can re-record the purchase transaction with the correct details.
How do I import a vehicle from the ASN Valuator app?
To import a vehicle marked “purchased” in the app:
Go to View/Edit Inventory and click “Add a New Car”. Click “Import” from the popup window.
“ASN Valuator App” may already be selected as the default source for importing. Otherwise, click “Change Source” to select the Valuator App as your import source. Once selected, highlight the vehicle you want to import and click “Import Vehicle”, or choose “Import ALL Vehicles” to import all vehicles in the list.
To import a vehicle marked “trade-in” in the app:
Create a new sale or load an existing sale to which you want to attach the trade-in. Add the trade value info on line 11 of the Deal screen to open up the “Trade” tab.
Open the “Trade” tab and click “Load from ASN Valuator App”. Select the vehicle you want to load into the deal as a trade-in and click “Import Vehicle”.
How do I pull a NMVTIS report for a vehicle?
A NMVTIS report can be pulled from multiple screens in the software including:
Sales > Book Values - Use this screen to pull the NMVTIS report for any vehicle, regardless of whether it exists in your inventory. Click the NVMTIS button at the top of the screen.
Sales > Vehicle Info - While working a deal, you can use this screen to pull the report for the sale vehicle. Click the NVMTIS logo on the right side of the screen.
Sales > Contracts - Use this screen while printing sales contracts to print the NMVTIS report for the sale vehicle. Click the NVMTIS logo on the bottom-right corner of the screen.
Inventory > Printing - Use this screen to print a NMVTIS report for any vehicle in your inventory. Click the NVMTIS logo on the bottom-left corner of the screen.
NOTE: You must first sign up for a VINAudit account in order to pull NMVTIS reports. To do so, just click on any of the above mentioned NMVTIS buttons to be directed to the signup form. If you already have an account, there will be link on the signup form to log into your existing account.
How do I remove a vehicle from my website and inventory feeds?
How do I run an AutoCheck report on a vehicle?
You can run an AutoCheck report from the View/Edit Inventory screen or the Book Values screen.
To pull an AutoCheck report for a vehicle in your inventory, go to Inventory > View/Edit Inventory. Load the vehicle on line 1. Click the AutoCheck button on the top-right corner of the screen.
To pull an AutoCheck report for any vehicle, regardless of whether it is in your inventory or not, go to Sales > Book Values. Enter the vehicle's VIN on line 1. Once the VIN has been decoded, click the AutoCheck button on the top-right corner of the screen.
Note: In order to pull an AutoCheck report from within your DMS, you must have an AutoCheck account that has been integrated with ASN. Dealers can sign up for an AutoCheck account by filling out one of the AutoCheck sign-up agreements available on the DealerZone under Other > Documents. If you already have an AutoCheck account and would like to discuss integrating it, please contact our office.
How do I show a vehicle's asking price AND (discounted) sales price on my ASN-hosted website?
Open the DealerZone and click Web > Website Manager.
Add the labels you'd like to use on your website for the vehicle's original price, sales price, and savings amount.
Note: "Original Price" pulls from line 53 (Asking Price) of the Edit Inventory screen. "Sales/Internet Price" pulls from line 55 (Sale Price). The savings will be calculated automatically as the difference between the two.
Scroll down and click "Save".
How do I undo a sale with a trade and remove the trade from inventory?
How do I use the smog check button on the Inventory screen?
Please note that due to changes made by the CA Bureau of Automotive Repair (BAR), we are no longer able to offer automated smog checks on vehicles. The following instructions demonstrate how you can use this tool manually:
On the inventory screen, click the Smog Check icon on line 38. Next, click the Smog Check button in the following popup to open the CA BAR Vehicle Smog Check History Search.
The system will automatically copy the vehicle's VIN to your clipboard. On the BAR site, make sure you have the search option set to "VIN", and then paste the VIN into the corresponding field. Click "submit" to locate the vehicle's smog check history.
You can then copy and paste the smog check history into the Smog Cert. Info popup on the Inventory screen. Click the "Save" button to save your changes.
How do I wholesale inventory using the quick wholesale option?
Load the vehicle in the Inventory screen and select the Wholesale option on line 32. You will be asked if you want to quickly wholesale the vehicle. Click "Yes" to proceed. (Note: If "Wholesale" is already selected on line 32, switch to Retail and back to Wholesale to re-generate this prompt.)
Use the blue arrow on line 3 to select the vendor to whom you are wholesaling the vehicle, and then enter the sales date, price, and miles at sale on lines 4-7, respectively. Click "Create Finalized Wholesale Deal" to save.
You can then click the blue arrow on line 25 to open the Quick Wholesale in the deal screen and print contracts.
How do we make a trade-in vehicle available for resale? It's not currently listed to choose from on line 1 of the Deal screen.
Once a deal with a trade-in is tripped or finalized, the trade vehicle will be assigned a stock number in your inventory. You must activate the trade before it will be available to add to a new sale. To do this, load the trade in the Inventory screen. There are two ways to do this:
Option 1: Load the deal attached to the trade-in vehicle. Open the trade tab and click "View in Inv. Screen".
Option 2: Go to the Edit Inventory screen and use the blue arrow on line 1 to open the "Choose Vehicle" window. Filter by "trade" on line 9 and locate the trade-in vehicle in the list below. Double-click to load the vehicle in the Inventory screen.
Mark the vehicle as "Active" on line 31. You will then be able to add it to a new sale.
How do you activate a trade-in?
How do you remove a vehicle from inventory once sold?
How to Automate my Asking, Minimum or Sales Prices?
On the Inventory/Edit Screen, if you have the appropriate security clearance #935, labeled as Global Price Change, you'll notice a gear icon in the top section. If you click on it, the third selection is a new feature called 'Automated Pricing Rules'.
Automated Price Tool: Your Inventory Pricing Solution
What is it?
Our Automated Price tool empowers dealers to take control of their inventory pricing effortlessly.
Key Features:
- Adjust Asking Price, Sales Price, and Minimum Pricing.
- Base adjustments on Commissionable Cost or other pricing tiers.
- Choose percentage or flat increase/decrease amounts.
- Set rules based on filters like inventory aging or specific stock criteria.
- Apply rules with ease and see immediate results.
- Monitor profit changes and visualize inventory adjustments.
Why it Matters:
With our tool, dealers can streamline pricing management, ensure competitiveness, and maximize profitability.
How to Get Started:
Simply access the feature through our platform and begin setting rules tailored to your dealership's needs.
Take control of your pricing strategy today with our Automated Price tool!
The VIN on a vehicle is not decoding or is decoded improperly, and I am not getting correct book values. How do I fix it?
If you have a VIN that is not decoding or is decoded incorrectly, first try to force the system to un-decode and re-decode the VIN using the left (undecode) and right (decode) arrows on line 4. In many cases, this will solve the problem by allowing you to reselect the proper options as needed.
Note that if the vehicle has already been sold, you'll need to first check the "Unlock" box on the bottom-right corner of the screen before you can use the decoding options on line 4. If you do not see an "Unlock" option and the arrows on line 4 are greyed out, this means you do not have the proper security access to unlock the screen. Please contact your administrator for assistance.
If re-decoding the VIN does not work, send in a TSM with the following information: full VIN, year, make, model, submodel, drivetrain, transmission, and engine. Please be sure to include all of these details as we need the full vehicle specs in order to look into the matter.
What happens to my inventory photos once a car is sold?
What is the California Car Buyers' Protection Act?
What vehicle disclosures will void the Manufacturer's Warranty as displayed on the Buyer's Guide?
When creating a Buyer’s Guide in the System, you have an option to checkmark a box that states: “Manufacturer’s Warranty Still Applies”. If you do so, the box will automatically be checked for any vehicle that the system deems is still covered by the manufacturer’s warranty.
If any of the following disclosures are selected for a vehicle in the Inventory screen, this will signify to the system that the manufacturer’s warranty is VOID, and the box for Manufacturer's Warranty on the Buyer's Guide will not be checked.
Disclosures that Void the Manufacturer’s Warranty:
-
Prior Salvage/Junk
-
Frame Damage
-
Prior Rebuilt/Reconstructed
-
Prior Canadian Title
-
True Miles are Unknown
-
Altered Suspension System - Vehicle has been raised
-
Altered Suspension System - Vehicle has been lowered
-
Dealer Rental Vehicle
-
No Structural Guarantee
-
No Frame Guarantee
-
Previous Canadian Vehicle
-
No Manufacturer Warranty
Why does my CA diesel vehicle now show that it needs to be smogged?
Why does the service contract popup read "Warranty Plans Invalid!" on a vehicle that should qualify for a service contract?
There are several reasons why a qualifying vehicle may not return plan options. In most instances, the system will indicate the reason, which is usually one of the following:
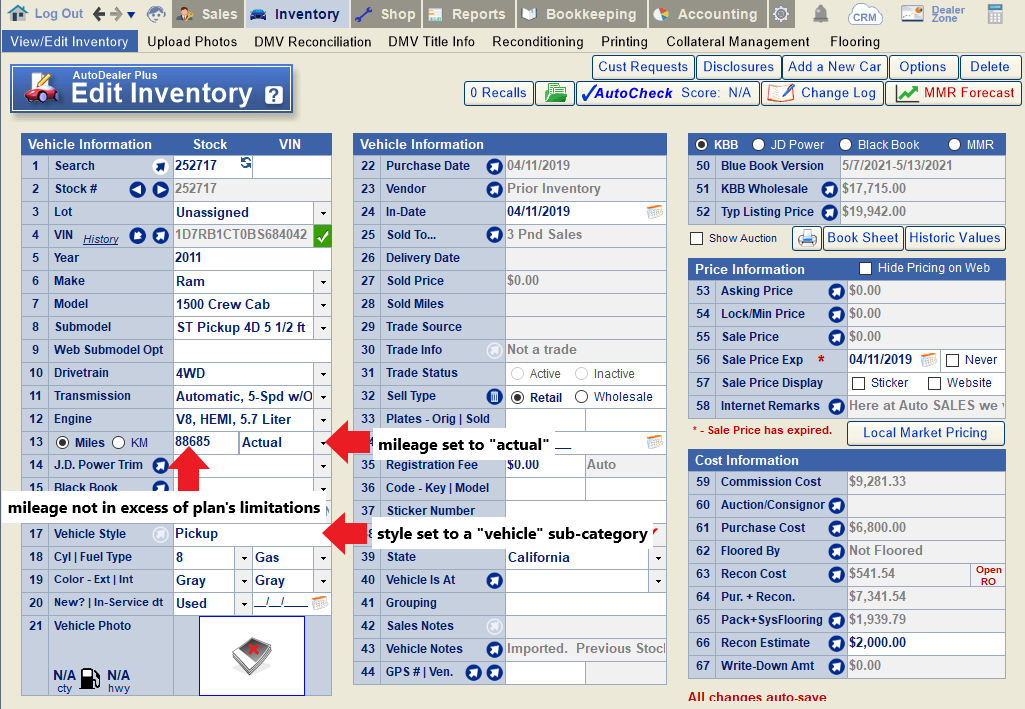
Invalid Mile Status: Check to make sure that the mileage type listed on line 13 of the inventory screen is set to "Actual". Any other mileage type will not qualify.
Miles in Excess: The mileage may be too high to qualify for the selected service contract. Verify the mileage you have entered on line 13, as well as the "miles at sale" entered on line 7 of the F&I screen.
Incorrect vehicle style: Check the vehicle style selected on line 17 of the Inventory screen. If it is set to RV, watercraft, ATV, or "other", the system may not return any service contract plans.
Lastly, different service contract and GAP providers have different guidelines that may disqualify a particular vehicle or deal. Contact your agent for information regarding specific qualification guidelines.
If you make any changes to mileage or vehicle style, click the "refresh" icon on line 1 of the Deal screen to refresh the VIN, and then re-attempt adding a service contract to the deal.
Why is my recently added reconditioning item not showing on the Reconditioning List for that stock?
Why is my vehicle sales price not showing on my website?
Why is the Edit Inventory screen greyed out for a vehicle?
Once a deal has been tripped, the Edit Inventory screen for the sold vehicle will be locked, and most fields will be greyed out. Depending on your security access, you may still be able to make changes to the screen by unlocking it.
Load the vehicle in the Inventory screen and checkmark the "Unlock" button on the bottom-right corner of the screen.
Once unlocked, you'll be able to make changes to the screen as usual. To re-lock, you can either uncheck the "Unlock" button again, or just change the screen to a new stock number.
Tip: Security #598 (Unlock Fields) gives a user the ability to unlock the Inventory screen.