A mass email or text can be sent to a group of customers in one of two ways, using the DMS;or the cloud-based CRM. The option you choose will depend on the customers you are trying to reach, the availability of customer data, and the amount of customization desired. Please note that in order to send a mass text, you will need a texting subscription with ASN.
Option 1: Send through DMS (using Reports > CRM or Bookkeeping > Collections).
Pros:
- Most simple option
- Does not require subscription to ASN CRM
- More filtering options for BHPH/financed loan customers
Cons:
- Less customization available
- Less filtering options based on sales data
- Does not target CRM leads that have never been imported into ADP
To send from the CRM tab in the Reports section:
Use this screen if you are not specifically targeting BHPH/financed loan customers.
Go to Reports > CRM. Use the filters on lines 1-16 to generate a list of clients to target. Note that if sending a mass email, line 3 (Has Email?) should be set to "Yes" only. Once your list has been generated, select "Mass Email" or "Mass Text" at the top of the screen.
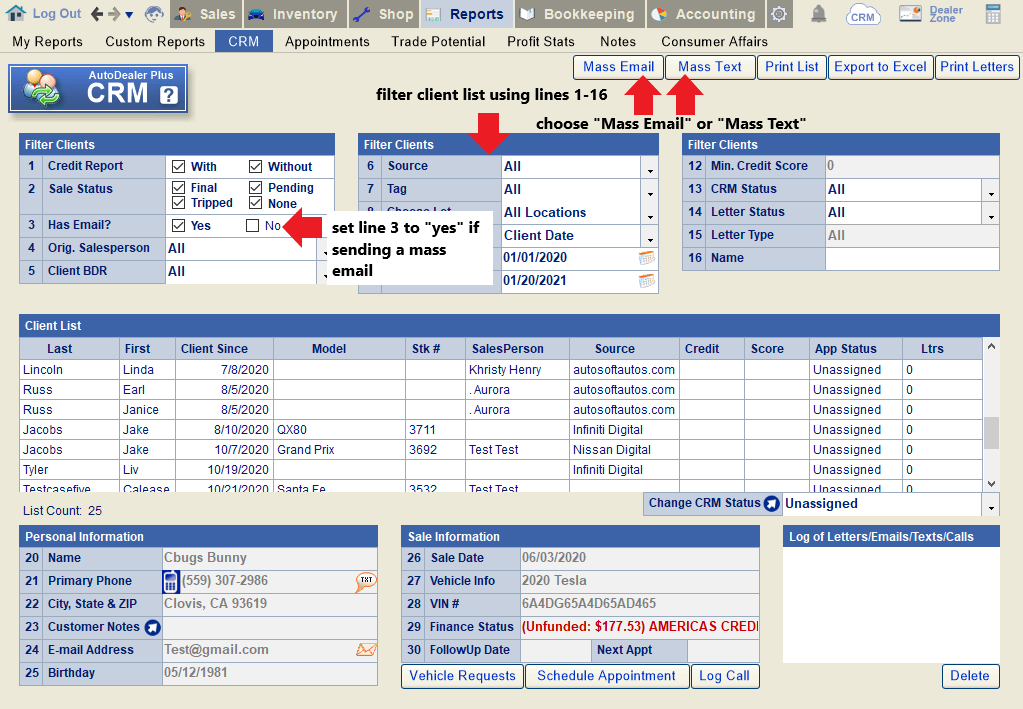
For a mass email:
Enter the desired message in the "Email Message Body" section. The system will display a preview of the email below. Use the checkmarks on the left-hand side to include an optional salutation (automatically inserts the customer's name) and an unsubscribe link at the bottom of the email. If desired, up to two attachments can be added to the email using the arrows on lines 2 and 3. Enter the email subject on line 4. Click "Send the Emails" button to send immediately, or "Save this Email Template" to save the email for later.
If desired, HTML can also be pasted into the email message body to create a more stylized email. There are many free tools online that can convert plain text into HTML.
For a mass text:
Enter the text you'd like to send to this group of customers in the "Text Message" field. Then click "Send Texts".
You can also create and send pre-saved messages using the blue arrow under "Choose Message Templates".
To send from the Collections tab in the Bookkeeping section:
Use this screen if you are specifically targeting BHPH/financed loan customers.
Go to Bookkeeping > Collections. Use the filters on lines 2-17 to generate a list of clients to target, or pull a list from a pre-saved report using the dropdown on line 1. (Note: If you make changes to the filters on lines 3 or 4, you will need to select "Produce/Refresh Report" to update the collection list below.) Once your list has been generated, select "Mass Email" or "Mass Text" at the top of the screen.
From here, follow the steps shown for sending a mass email or mass text as outlined above.
Option 2: Send through the cloud-based CRM
Pros:
- More customization available
- Targets all leads as well as sold customers who have been synced into the CRM*
- More filtering options based on sales and lead data
Cons:
- Somewhat more complex to implement
- Requires subscription to ASN CRM
- Less effective if leads are not being pushed to the CRM
- Less filtering options for BHPH/financed loan customers
- Requires access to CRM global settings, which some users may not have
Open the CRM and click on Settings.
Navigate to the Leads tab.
*Recommendation: If you have not done so already, scroll down to the section labeled "Auto-Upload/Sync from ADP Sales Data" and toggle this feature to "On". This will sync all sold customer data from the last 6 years into your CRM, allowing you to target these customers for mass communication or other follow-up. After turning this feature on, you will need to wait for the data to sync overnight.
Next, locate Mass Communication towards the top of the screen and click "Go".
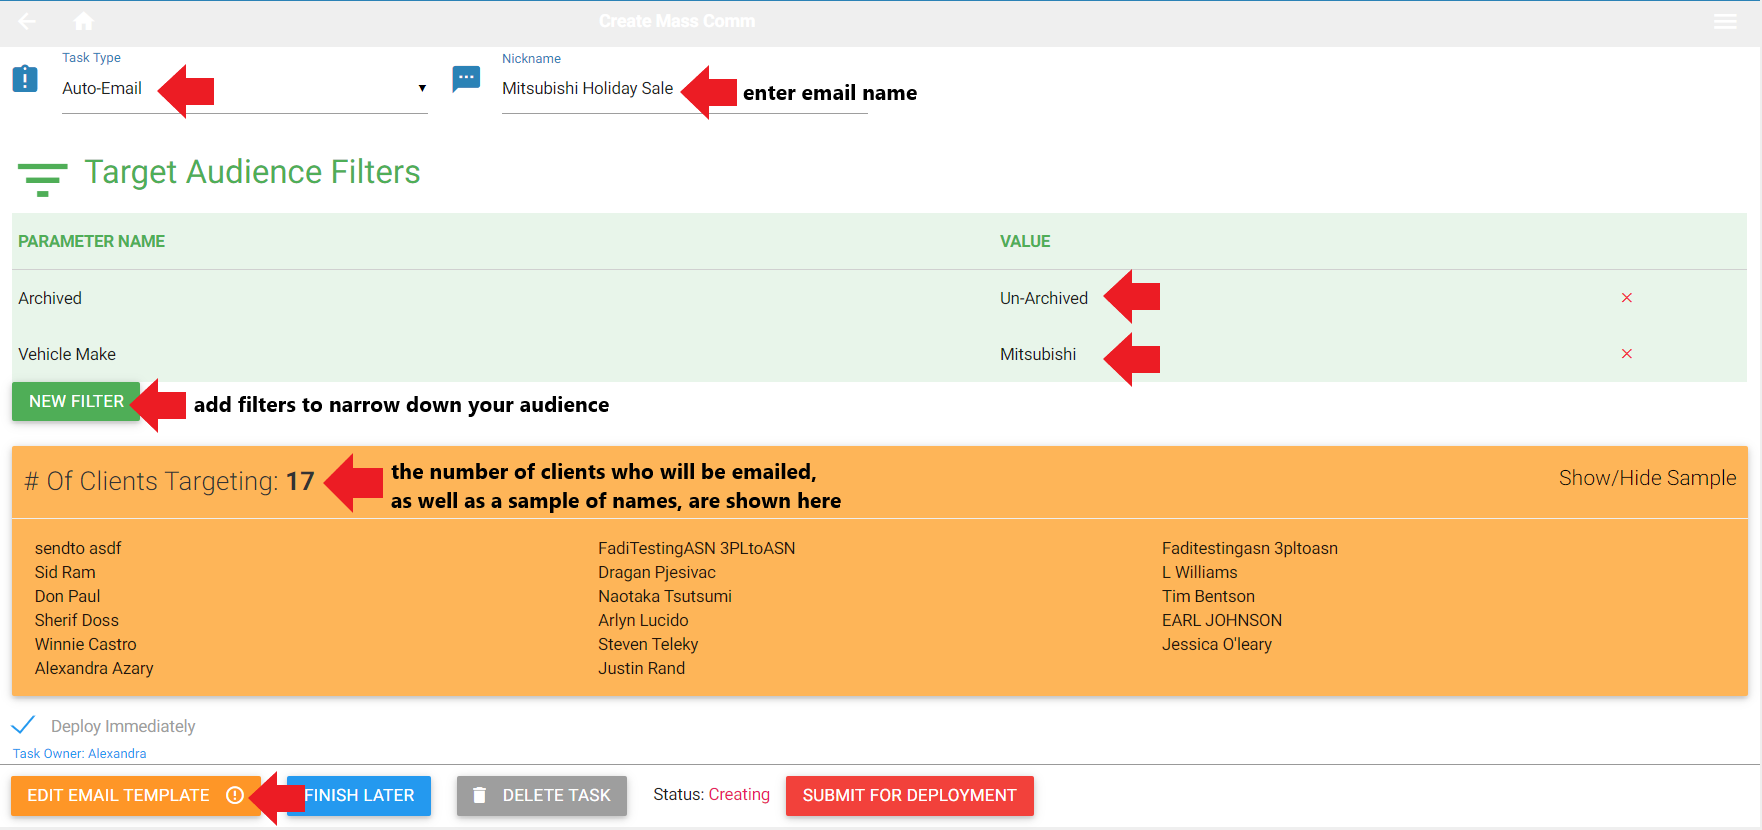
For a mass email:
Under "Task Type", choose "Auto-Email". Add a name for the e-mail in the "Nickname" field (this name is just for your reference).
Use the "New Filter" button to select which customers you want to target in your mass email. In the example shown below, the email is being sent to un-archived customers who are interested in a Mitsubishi vehicle only. The yellow box will indicate how many customers will be included in the mass e-mail, along with a sample of the customers included.
Next, click the "Edit Email Template" button to design your email.
Enter the subject line for the email in the "Email Subject" field, and then type in the desired email message in the "Body" section. Use the provided variables to automatically insert details such as the customer's name, dealership name, etc. For example, in the image below, {{FirstName}} is used in the email subject line to automatically insert the first name of the email recipient.
Click the red checkmark to save your changes when done.
Note: Use the "source" option if you'd like to paste HTML into the email body.
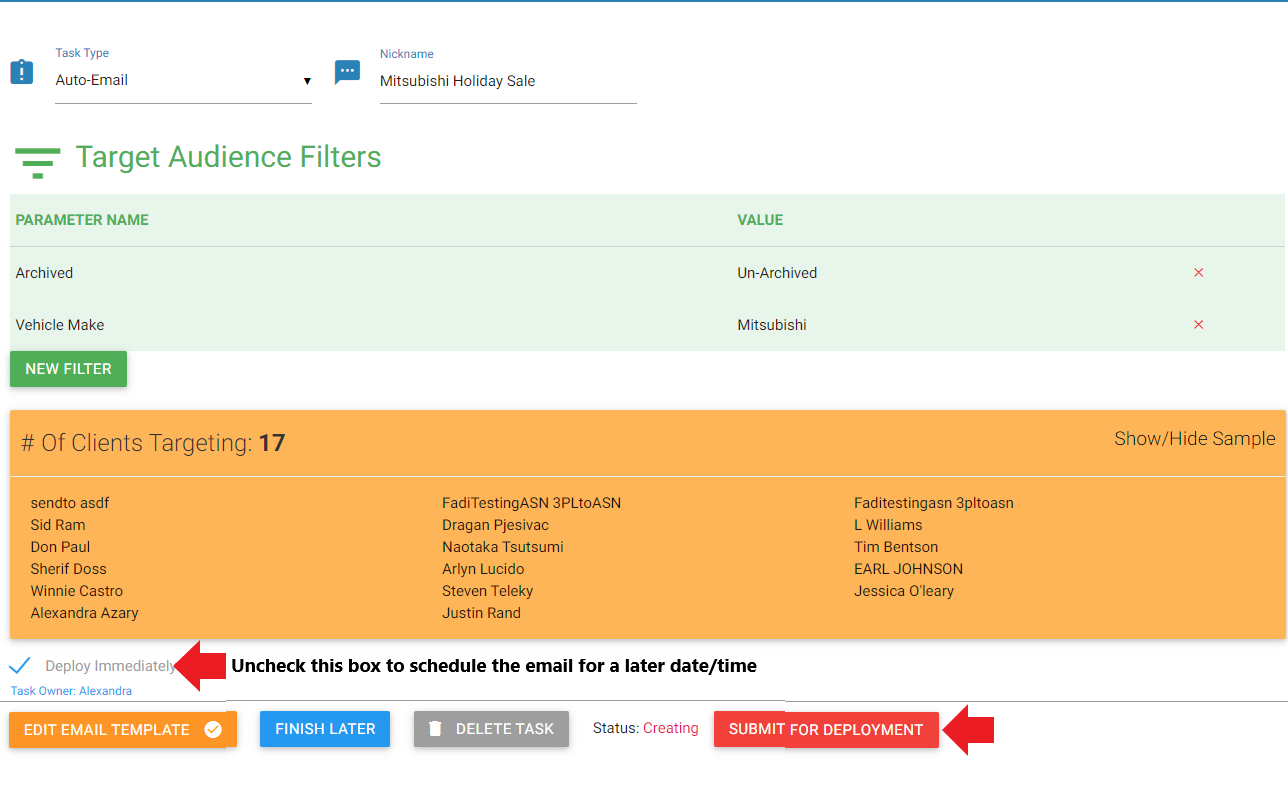
Finally, click "Submit for Deployment" once you are ready to send out the mass email.
Tip: All mass emails are saved as templates once they are created. We highly recommend previewing the template under a specific client's name (or sending a test email to yourself) before sending out the mass email.
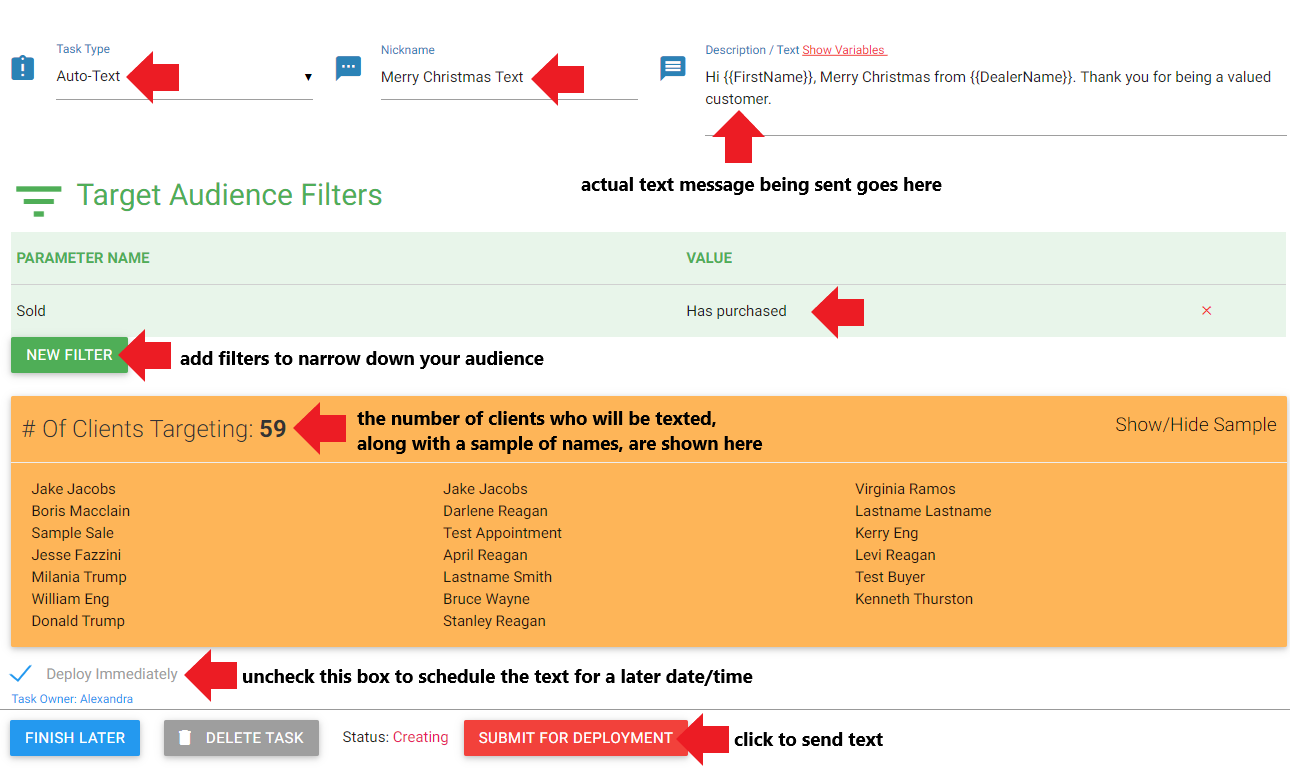
For a mass text:
Follow the steps above to open the Mass Communications screen. This time, choose "Auto-text". In the nickname field, enter a name for the mass text (for your reference only). In the description/text field, type in the text you'd like to send. Use the provided variables to automatically insert details such as the customer's name, dealership name, etc. For example, in the image below, {{FirstName}} is used to automatically insert the customer's name into the text message.
Click the "New Filter" option to filter for a list of clients you'd like to target in your mass text. In this example, we are filtering for customers who have previously purchased from the dealership only. The yellow box will indicate how many customers will be included in the mass text, along with a sample of the customers included.
Once you are ready to send out the text, click "Submit for Deployment".
Note: Mass communication in the CRM works on a per-lot basis. For dealers with multiple lots, you will need to duplicate the mass email/text you created for every lot in order to send to customers at all lots.