F.A.Q.'s and How-To's
Can the system automatically delete pending deals after a set amount of days?
How can I add a contract cancellation option to a deal?
From the deal screen, click the arrow on line 5 to open the Fees popup. Make sure you have the Contract Cancellation fee checkmarked. Depending on how the fee is set up in your system defaults, you may be able to change the price as well. Click "Save" to save your changes.
Once the contract cancellation option has been added, you should see the associated contract available to print in the Contracts screen.
Note: The exact location of the contract on this screen will vary depending on how your Contract lists have been set up. If you don't see the Contract Cancellation Option at all, you may need to assign the contract to a button or your right-hand list.
How can I change the ACV of a trade-in vehicle after a deal is tripped or finalized?
To change the actual cash value of a trade-in, you'll need to load the original sale through which the vehicle was acquired. You can quickly do this by loading the trade in the View/Edit Inventory screen and clicking the blue arrow on line 30 to open the Deal screen.
Open the trade worksheet using the blue arrow on line 11 of the Deal screen. Change the ACV on line 3 as desired. Then, re-save the deal to save your changes.
If the sale is locked, you will need to unlock it before you can make any changes.
To do this, go to Sales > Recap and click "Unlock Sale".
You can then adjust the trade ACV on the Deal screen using the method described above, or by clicking the blue arrow on line 6 of the Recap screen. Be sure to re-save the deal and re-lock the sale once you're done.
Note: If the trade loss on line 6 is "$0", the arrow will be inactive. In this case, you will need to use the Deal screen to change the trade ACV.
Once the trade is refreshed on the View/Edit Inventory screen, the trade cost on line 61 will reflect the new ACV.
Note that changing the ACV of a trade will affect the profit of the deal through which the trade was acquired.
How can I delete a pending deal?
How can I delete a sale? Clicking the "Undo Sale" button is only making it a pending deal.
The "Undo Sale" button, will only undo the tripped or final status of the deal and "kick" it back to Pending status. To delete the sale once moved backed to pending, click the "Search Sale" button and select (but do not open) the deal in question. At the top of the search popup there is a "Delete" button. This will permanently delete any pending sale.
Refer to FAQ ID#: 231
located here for more information.
How can I find the ROS number for a previous sale?
There are two ways to locate the ROS number of a previous sale.
Option 1: Go to Sales > Deal screen. Load the stock number of the sold vehicle on line 1.
Open the F&I tab. The ROS # is listed on line 11.
Option 2: Go to Reports > My Reports. Click on the "DMV reports" button. Use the "ROS Detail List" report to pull a report of all sales within a given date range. This report will list the ROS # for each sale.
How can I hide the APR when printing sales quotes?
How can I mark the vehicle on a sale for commercial registration/use?
How can I set a default "days due" value for one-pay deals?
Go to Settings (gear icon) > Defaults > Miscellaneous Defaults. Set your desired "days due" on line 25.
(For example, if the value on line 25 is set to 7, payment on one-pay deals will be due 7 days from the sales date, by default.)
Log out and back in for changes to take effect.
In the below example, the sales date is 2/4/2020. When the term is set to "1" on line 19, the Days Due (line 16) is automatically changed to "7", and the First Payment Due (line 17) is set to 2/11/2020.
How can I set defaults for a lender, such as Loan Doc Fee, Discount, or Par Split?
Go to Settings (gear icon) > Client Setup. Choose Finance/Lienholder for the Acct Type on line 1, and select the lender whose defaults you'd like to change.
Loan Doc Fee, Discount, and Par can be set on line 29. Bank Fee, VSI, and Prepaid Finance Charge are set on line 30.
Changes are saved automatically, and will take effect on any future deals the finance company is assigned to.
How can I set the default "days due" or payment dates on sales?
For one-pay deals, see these instructions for setting the default days due.
For all other deals, you may choose to either default to 1 month after the sale, a set number of days after the sale, or specific payment due dates.
To do this, go to Settings (gear icon) > Defaults > Miscellaneous Defaults.
To default to 1 month after sale:
Select "No - Just default to 1 month from sale" on line 20. (The first payment will be due a month after the sale date.)
To default to a specific number of days after the sale date:
On line 20, select "No - Just use the number that I input below as a default for new sales".
Then, on line 21, enter the default "days due" number desired. In the example below, the first payment will be due 45 days after the sale date, by default.
To set specific payment due dates (i.e., the 1st, 15th, and 30th of each month):
On line 20, select "Yes - All Sales" (or "Yes - Lease Only", if desired).
On line 21, select the minimum amount of days between the sale date and the first payment date.
On lines 22, 23, and 24, enter the desired payment due dates.
In the example below, payments will be due on either the 1st, 15th, or 30th of the month, but no less than 15 days after the sale date.
Please Note: All of the above settings are saved automatically, but will take affect upon the next log in, for newly created sales only.
How can I set up an electronic filing fee to charge customers for processing vehicle registration and titling transactions?
How can I switch a deal from wholesale to retail?
How can I undo a sale with a trade and keep the trade in inventory?
In Sales > Deal, load the sale in question and click "Undo Sale".
Choose the Undo Date on line 1 and the Reason for Undo on line 3. On line 4, select "Do Not Remove Trade". The system will ask you to confirm that you want to keep the trade. Click "Yes" to continue.
Click "Undo Sale to Pending" and then click "Yes" to confirm.
The trade is now removed from the sale entirely. If you load the trade vehicle in the inventory screen, you'll see that it is marked as a general purchase. If you click the arrow on line 61 (Purchase Cost) of the Inventory screen and edit the vehicle purchase, you'll see that line 7 of the popup has a note that the vehicle was a trade from a deleted sale.
If you load the "General Purchases" vendor in the Write Checks screen, you'll see a payable for the cost of the trade, including any balance owed to the lienholder as well as the net trade value owed to the customer.
How can I zero out the sales tax on a deal?
How do I add a new GAP vendor?
Go to Settings (gear icon) > Client Setup. Click "New" and choose "Vendor". Enter the details of the GAP vendor in the corresponding fields.
In the "Misc Information" tab, choose "GAP" as the Vendor Type on line 1 and select a default expense account on line 2 (typically 51016 - Vehicle Gap Contract Cost). Make sure the third column on line 15 is set to "Yes" if you want the GAP cost to post to accounting automatically when a deal with GAP insurance is tripped. Click "Save" on the top-right of the screen to save the new vendor.
To set the default GAP price for this new vendor, see this FAQ.
How do I add a new Service Contract option?
First, add a new Service Contract vendor. Go to Settings (gear icon), Client Setup. Click "New" and choose "Vendor".
Fill out the fields under Contact Information and Miscellaneous Information. Under Misc. Information on line 1, make sure you select "Service Contract" for the Vendor Type. For line 2 (Default Expense Account) we typically recommend 51014 - Vehicle Service Contract Cost. Once all the information has been entered, click "Save".
Return to the Deal screen. Click the arrow on line 6 to open the "Choose Service Contract" pop-up. Select "Co" as the Company on line 1. Then, click the arrow on the gear icon to add or manage a plan.
Click on 'Set Up VSC Companies' and enter the plan info and vendor in lines 2 through 7. You will now be able to select the vendor on line 4 and the plan slot on line 6. The system will also automatically create a payable to the vendor when the service contract is sold.
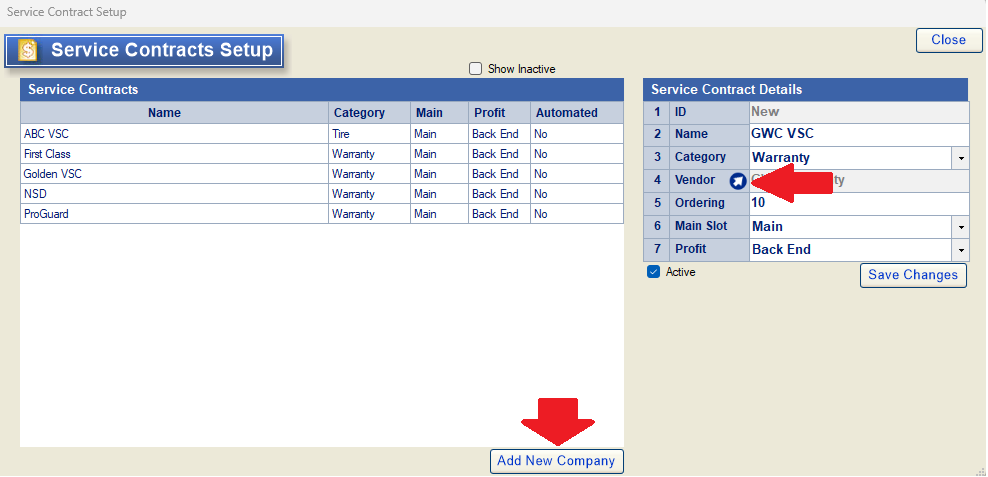
Click 'Add New Company' and enter the plan info and vendor in line 2 through 6.
Once done, you will now be able to select the company on line 1 and the plan on line 2. The system will also automatically create a payable to the vendor when the service contract is sold.
How do I add a third trade-in to a deal?
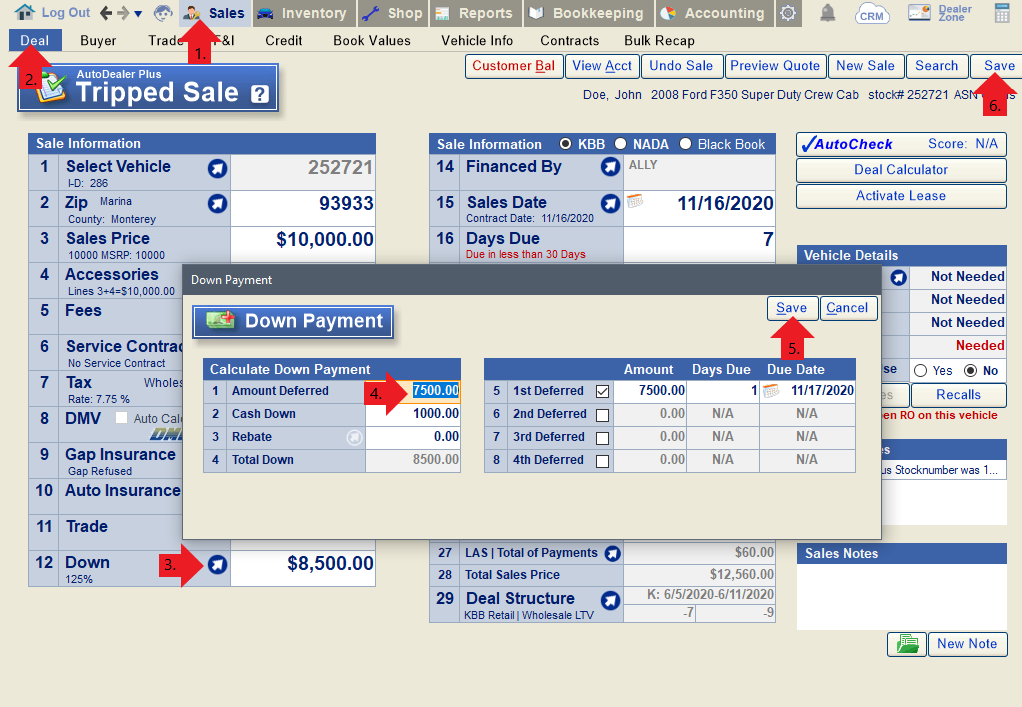
Because most sales contracts only allot space for two trades, the deal screen will only allow you to add two trade-in vehicles to a sale. In the event that a customer has three trade-ins, here is the process we recommend following:
1. Add a deferred down payment to the deal, equaling the net value of the third trade. You can do this by opening the Down Payment popup on line 12 of the Deal screen. In this case, we are assuming the third trade-in has a net value of $7500.
2. Stock in the third trade-in as an off-the street purchase on the Inventory screen. Enter the VIN and other necessary vehicle information on lines 5-8. Enter the trade value as the purchase amount on line 14. Enter the trade owner's information in lines 20-24. Enter the lien amount (if any) on line 25 and select the lienholder on line 26.
Once the purchase is saved, the system will automatically calculate the net trade value (invoice balance owed to the customer) on line 15. You can also print documents for the purchase of the trade-in from this window.
3. Clear the payable for the third trade and the receivable for the deferred down (these should be equal amounts) using the clearance account. Add a memo to both transactions to signify why the clearance account was used.
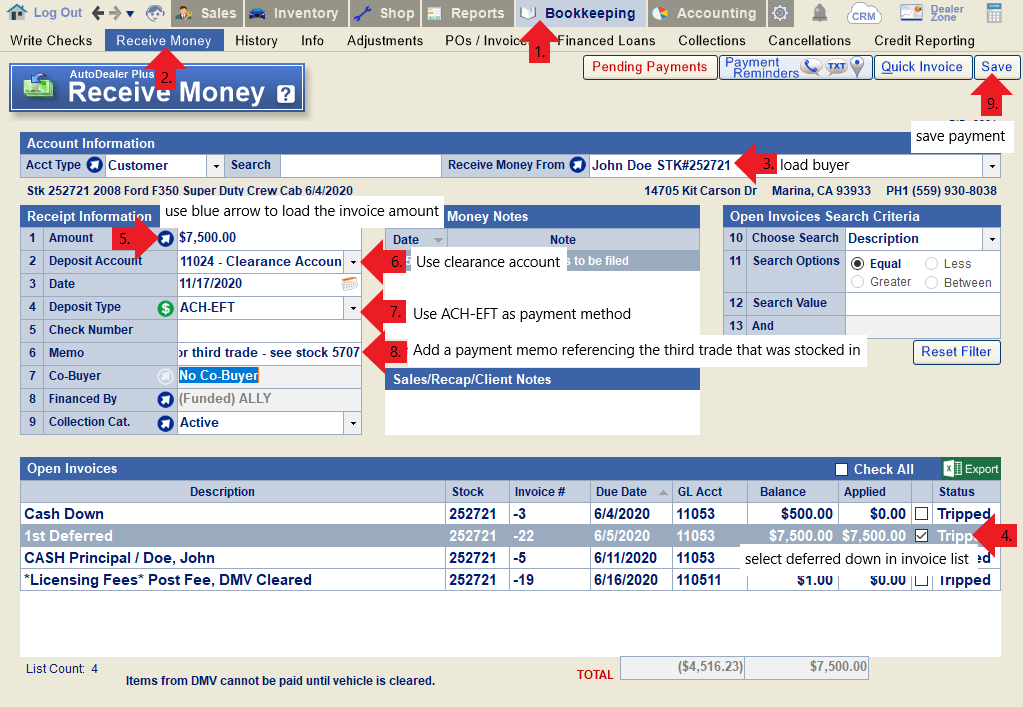
Clear the receivable for the deferred down.
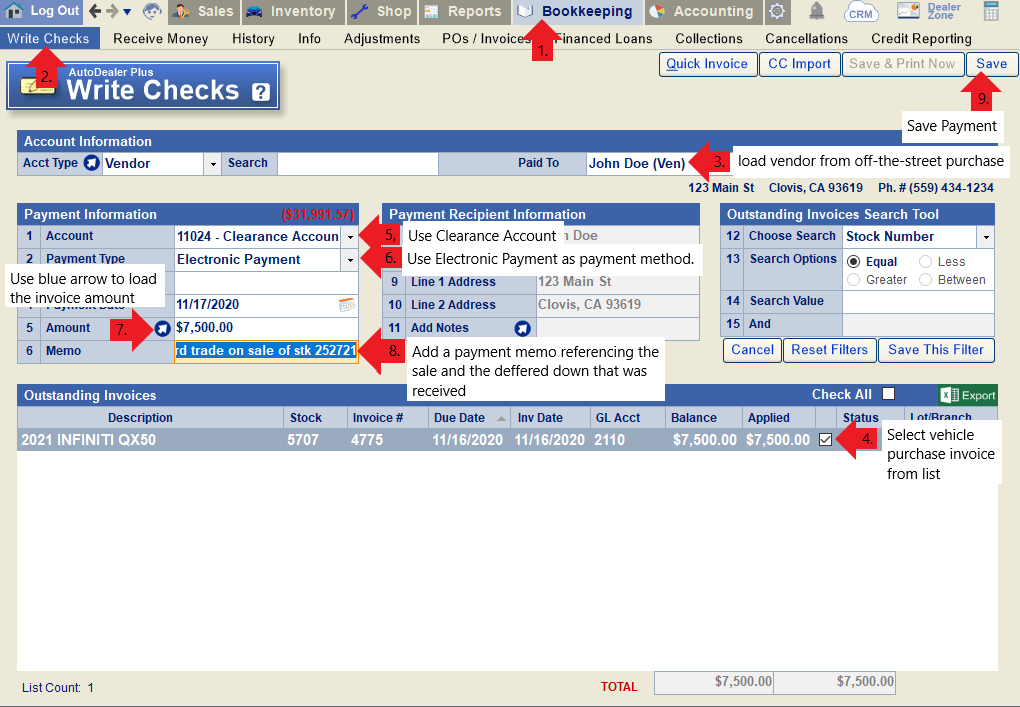
Clear the payable for the purchase of the third trade.
How do I add auto insurance to a deal?
In order to add auto insurance to a deal, you will first need to activate this feature. Read this FAQ for more information.
Next, add an insurance vendor in Client Setup. To do this, go to Settings (gear icon) > Client Setup. Click "New" at the top and choose "Vendor". Enter the insurance vendor name on line 1, and fill in the remaining fields as needed on this screen.
In the "Misc. Information" tab, select a vendor type and default expense account on lines 1 and 2. Click the save button at the top of the screen to save the vendor to your system. After saving the vendor, go back to the "Misc. Information" tab and set "Is Ins." to "Yes" on line 15.
You will then be able to use the blue arrow on line 10 of the Deal screen to select the Insurance Vendor you created, and add deductibles, limits, terms, and premium costs as needed. Click the "Save" button on this popup to finish adding insurance to the deal.
Once the deal is tripped, the system will automatically generate a payable to the insurance vendor for the total cost of the insurance.
How do I add or remove default accessories on the Deal Screen?
To Add an Accessory as a Default:
Go to Sales > Deal. Load any vehicle on line 1. Click the blue arrow on line 4 to open the Accessories window.
Select the accessory you wish to make a default in the Accessory Repository (Master List). Click "Edit". On line 7, select "Added to Every Sale". Then click "Save to List". The accessory will now be added to every new sale by default. You will need to reset the deal screen in order to see this take effect.
To Remove an Accessory from Defaults:
Go to Sales > Deal. Load any vehicle on line 1. Click the blue arrow on line 4 to open the Accessories window.
Select the accessory you wish to remove from defaults in the Accessory Repository (Master List). Click "Edit". On line 7, select "Manually Only". Then click "Save to List". The accessory will no longer be added to new sales by default. You will need to reset the deal screen in order to see this take effect.
How do I attach an accessory to a vendor so that the cost of the accessory posts to accounting automatically?
Add the accessory vendor to your system if you have not done so already. Go to Settings (gear icon) > Client Setup. Click "New" and choose "Vendor". Add the vendor information in the corresponding fields.
Click over to the "Misc Information" tab. Mark "Yes" for "Is Acc" in the middle column of line 15 to mark the vendor as an accessory vendor. Click the "Save" button on the top right to save your changes.
Next, go to Sales > Deal and load a sale. Click the arrow on line 4 to open the Accessories window.
In the Accessory Repository, click "Add New" to create a new accessory, or select an existing accessory and click "Edit". Make sure all of the Accessory Details are added; on line 5, select the accessory vendor you created in the previous steps. On line 6, choose which expense account you would like the cost of the accessory to post to. Then click "Save to List".
Any time the accessory is added to a deal and the deal is tripped, you will now see a payable to the vendor for the cost of the accessory in Bookkeeping > Write Checks.
How do I change the default price and term for GAP?
Go to Settings (gear icon) > Defaults > Sales Defaults.
To change the default price:
Default price is set per vendor, so each GAP vendor can have a unique default price. Select the GAP vendor whose price you want to change on line 1. Enter the default price on line 2.
To change the default term:
Default GAP term affects all GAP vendors. Enter your desired default term on line 6.
Log out and back in for all changes to defaults to take effect. These changes will only be reflected on new sales created after the change has been made.
How do I enter a trade-in with a lien balance due?
How do I handle a trade-in where the customer owes less than the allowance and wants cash back?
Enter the lien as either the full allowance amount or the
allowance plus any portion the customer wishes to apply as a down payment. In
the Trade tab, enter the actual payoff
amount. The system will then generate an adjustment for the lender and a
payable to the customer. Pay the lender using the offset to reduce the payoff,
and issue a check to the customer for their remaining cash-out amount.
Here is a step-by-Step Example:
To manage a cash-out trade where the customer has equity,
follow these steps:
- Enter
the Lien: Enter the lien amount equal to your trade allowance, or
the allowance minus the portion the customer wants to use as a down
payment.
- Enter
Actual Payoff: Go to the Trade tab and enter
the actual payoff amount. The system will create an
adjustment amount for the lender and a payable balance for the customer.
- Process
Payments: Pay the lender using the offset to clear the payoff,
then pay the customer the remaining difference.
Example Scenario:
- Trade
Allowance: $30,000
- Actual
Payoff: $23,000
- Customer
Down Payment: $2,000
- Cash-Out
Requested: $5,000
- In
this case, you would enter the lien as $25,000 (Allowance $30k - Down
Payment $2k - Cash Out $5k = $23k adjusted lien logic, or simply ensure
the math nets the desired $5,000 difference).
How do I pay off a lien-balance on a trade-in?
Load the sale attached to the trade-in on the Deal Screen and open the Trade tab. Make sure the lienholder is entered on line 9 and the Verified Actual Pay-Off is entered on line 12. Re-save the deal to save any changes if necessary.
Note: The deal must be saved as tripped or final before the payoff will show up in Write Checks to be paid.
Next, go to Bookkeeping > Write Checks. Select "Finance/Lienholder" as the account type and load the lienholder on the trade-in. You will see the Lien Amount for the sale in question listed in the Outstanding Invoices list to be paid.
Note: If the verified actual pay-off is more than the lien amount originally entered in line 8 of the Trade screen, you'll also see a lien adjustment payable to the lienholder and a lien adjustment receivable from the customer for the difference.
How do I print the information on the deal screen to present to a customer?
How do I process a cash-out trade-in if the new lender requires the trade allowance to match the actual payoff?
If
the new lender insists on the actual payoff to appear on your RISC, reduce the trade allowance to match
that payoff. Then, enter a "recon invoice" payable to the customer
and add expense to the unit to ensure the total cost aligns with
the Actual Cash Value (ACV). Please note that in states with sales tax trade-in
credits, this method may result in the customer losing their tax credit, as
they are "cashing out" rather than applying the equity toward a
tax-saving purchase.
Step-by-Step
If you are forced to match the trade allowance to the
actual payoff for lender compliance, follow these steps:
- Adjust
Allowance: Reduce the trade allowance until it equals the actual
payoff amount.
- Create
Payable: Enter a "recon invoice" payable to the
customer to account for the difference.
- Balance
Cost: Add expense to the vehicle unit to ensure
your total cost matches the original ACV.
This method allows you to handle a customer "cashing out" while keeping
the deal compliant with lender payoff requirements.
How do I retrieve historical KBB, JDP, or BB guidebook values for older sales dates?
To view guidebook values (e.g., KBB, JDP, Black Book) for a past date, navigate to the Sales > BookValues tab. Click the "Book Version and Date" line located in the top-right corner above the line 15 title. When the "New Value Date" prompt appears, enter your desired date and click OK. The values will update, and the line will appear in red to confirm the selected date range. Click Clear to return to the current system date at any time.
Here is Step-by-Step option:
A: If you need to match a vehicle's value to an older sales date, follow these steps:- Go to the Sales > BookValues tab.
- Click on the Book Version and Date line located in the top-right corner (above the line 15 title).
- In the "New Value Date" field, enter the date you are seeking and click OK.
- The system will refresh the values, and the date line will turn red to indicate the active historical date.
- You can process as many vehicles as needed under this date.
- To revert to the current date, click the Clear button.
This is helpful when you need an older guidebook value for a past sale. Ensure to print the report before resetting the date.
How do I set up a cash (one-pay/non-financed) deal?
To set up a cash or one-pay deal, you should first set up a finance company named "CASH" (or something similar). Instructions on adding a new finance company can be found here.
When building the deal, select the "CASH" finance company you created on line 14, and set the term to "1" on line 19.
Once the deal is tripped, there will be a receivable from the customer for the total price of the vehicle.
How do I undo a sale with a trade and remove the trade from inventory?
How do I undo a tripped or final deal?
Please Note: You should only use the "Undo Sale" button when a deal is truly being undone, i.e., the customer is returning the vehicle. Otherwise, you can make necessary changes to any unlocked sale and simply re-save as tripped or final.
If you do need to undo a sale completely, follow these steps:
Go to Sale > Deal and load the sale in question. Click "Undo Sale".
Choose the Undo Date on line 1 and the Reason for Undo on line 3. Then click "Undo Sale to Pending".
Tip: Reasons for Undo:
1) Not Tripped: The sale should not have been tripped (i.e., the customer never took possession of the vehicle).
2) Not Financed: You could not get financing for the deal.
3) Cancelled: The dealer cancelled the sale.
4) Option to Cancel Exercised: The buyer elected to use their option to cancel.
Note: If the sale in question has a trade, you will also have an option in the Undo Sale window to choose whether or not you will be keeping the trade. See this FAQ for more information.
How do we make a trade-in vehicle available for resale? It's not currently listed to choose from on line 1 of the Deal screen.
Once a deal with a trade-in is tripped or finalized, the trade vehicle will be assigned a stock number in your inventory. You must activate the trade before it will be available to add to a new sale. To do this, load the trade in the Inventory screen. There are two ways to do this:
Option 1: Load the deal attached to the trade-in vehicle. Open the trade tab and click "View in Inv. Screen".
Option 2: Go to the Edit Inventory screen and use the blue arrow on line 1 to open the "Choose Vehicle" window. Filter by "trade" on line 9 and locate the trade-in vehicle in the list below. Double-click to load the vehicle in the Inventory screen.
Mark the vehicle as "Active" on line 31. You will then be able to add it to a new sale.
How do you sell a car to a business or company name?
I'm getting an error regarding the service contract or GAP on a deal. How do I fix this?
For Service Contract Errors:
Open the Service Contract popup on the deal screen.
Click "Reset Plans". Once they've been reset, make sure the service contract selected is still correct and then click "Save/Close".
Finally, re-save the deal. Any service contract errors you may have been encountering should be resolved.
For GAP Errors:
Open the GAP popup on the deal screen.
Click "Reset GAP Plans". Once the system is finished getting new rates, choose the correct GAP again and click "Select". Finally, re-save the deal. Any GAP errors you may have been encountering should be resolved.
Note: If you do not see an option to reset GAP plans, remove the GAP from the deal by zeroing out the price on line 9. Then, go back into the GAP popup and add the GAP back to the deal. Re-save the deal before trying to print or preview the contract.
If a deal is unwound and the customer decides to purchase a different vehicle, how can we transfer the down payment to the new deal?
As long as the same customer is selected as the buyer on both deals, the system should automatically transfer any money received from one deal to the other.
Example: $100 Cash down payment was posted for this customer under stock# 227391.
When the deal is unwound, the system notes that this will create a payable to the customer for $100.
A new sale is created and tripped for the same customer, attached to a different vehicle.
The History screen now shows the original down payment applied to the new sale, under stock# 5705.
What is the California Car Buyers' Protection Act?
What is the purpose of the "Recon Estimate" field (Line 66) in the Edit Inventory tab?
The Recon Estimate field is a placeholder used to account for anticipated reconditioning (recon) costs for new vehicle inventory before final Recon invoices have been posted. This ensures that the sales team structures deals using accurate potential profit margins.
Key features and usage:
- Proactive Deal Structuring: By entering a default or estimated recon amount, your sales team can account for these costs during the deal-structuring process in the Sales Tab, preventing them from negotiating deals that might end up with lower-than-expected profit.
- Sales Tab Tool: This field functions similarly to a "Pack," but its impact is limited exclusively to the Sales Tab and deal structuring.
- Reporting: This amount is strictly for internal estimates. It is ignored by official financial and profit reports (such as "Recap"), ensuring that actual accounting records remain unaffected by the estimate.
- Profit Discrepancies: Because the estimate is a placeholder, you may notice that the Dealer Gross Profit (GDP) in line 25 shows a different net profit compared to your official "Recap" report, particularly if the estimated recon amount is higher than the actual final recon costs.
- Status Logic: Please note that DGP and the estimated recon amount will reset (removing the estimate) once a deal is Tripped or Finalized. Only "Pending" deals will reflect the DGP amount adjusted for estimated recon.
When does a pending deal become "Old Pending"?
Why are my DMV fees being split in the itemization on the retail installment contract?
In California, any vehicle that is four model years old or less is exempt from a transfer smog, and an $8 fee is due in lieu of the smog certification.When a deal is created, the system will automatically detect if a vehicle falls within this four year exception and will not add a default smog fee/smog cert fee to the deal. In this situation, you will see a note on line 5 of the Deal screen that says "Rule 2019", signifying that the 2019 law effects the smog rules for the vehicle being sold. The system will also automatically deduct $8 from the DMV fees to be itemized as an exemption fee on the retail installment contract.
In the below example you can see the Rule 2019 notice on line 5 and the DMV fee breakdown on line 8. When viewing the RISC, you'll see that $8 have been deducted from registration fees and itemized on line 4 as a state emissions exemption fee.
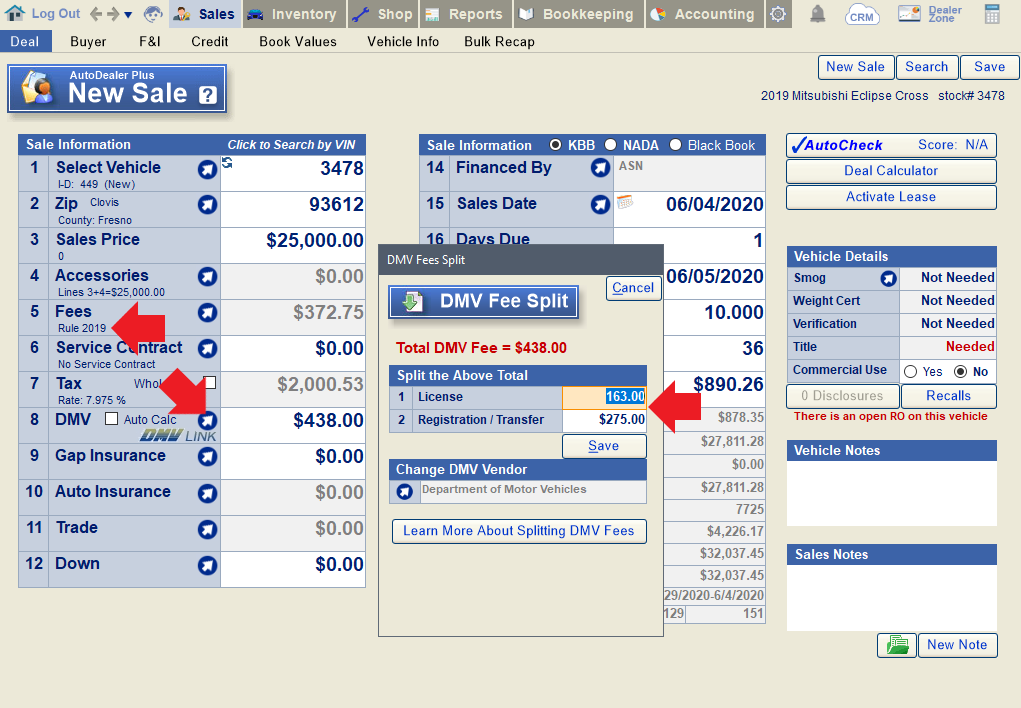
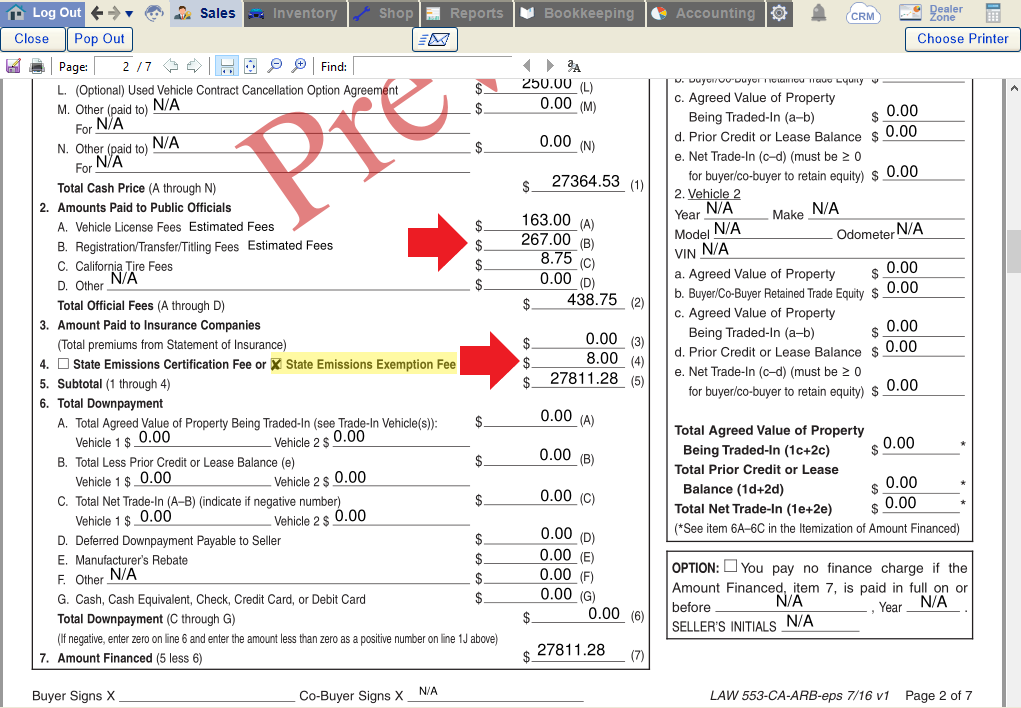
To avoid undercharging for DMV fees, you can use the DMV Link on line 8 of the Deal screen to calculate accurate fees for the vehicle in question using an interface with the CA DMV website. If you choose not to use this feature, be sure to add an additional $8 to the DMV fees inputted on line 5 to account for the smog exception fee when relevant.
Why can't I save changes to a final sale if I have full security access?
If there is no "Save" button showing on a Final Sale, this likely means the sale is locked. In this case, the deal screen will display "Locked Sale". You will need to unlock the sale to make changes.
To do this, open the Recap tab and click "Unlock Sale".
You will then see a Save button appear on the sale. Once done, be sure to lock the sale again on the Recap screen.
Why does changing Buyer information in one deal also change it in other deals?
Buyer records are shared profiles, not deal-specific records. Each buyer is uniquely identified by key information such as their SSN, Driver's License, email address, and phone number. This allows the system to automatically recognize returning customers and load their complete buyer profile into any new or existing deal.
When you update a buyer's profile, the changes are applied to that buyer's master record, which means all deals associated with that buyer will display the updated information, not just the deal you are currently editing.
Additional notes:
-
Previous addresses and employment records are retained and can be managed as historical information while adding new details.
-
All buyer profile changes are recorded in the Buyer tab's Change Log for auditing purposes.
-
To maintain clean customer records and ensure accurate future communication through your DMS or CRM, do not create duplicate buyer records using the same identifying information (such as SSN, Driver's License, email, or phone number).
 Caution
If you open an existing deal and overwrite the buyer's information with an entirely different person's information, you are editing the original buyer's profile, not replacing the buyer on that deal. This remains true even if the new SSN or Driver's License is different.
As a result, every deal linked to the original buyer will now reflect the updated (incorrect) information.
How to correct this situation:
-
Restore the original buyer's information on the existing buyer profile.
-
Open the Credit tab and enter the information for the new buyer.
-
Save the new buyer profile.
-
Reload the current deal.
-
Replace the buyer on the deal by selecting the newly created buyer profile.
Following these steps changes the buyer only for the current deal without affecting any previous deals associated with the original buyer.
Why does my CA diesel vehicle now show that it needs to be smogged?
Why does the service contract popup read "Warranty Plans Invalid!" on a vehicle that should qualify for a service contract?
There are several reasons why a qualifying vehicle may not return plan options. In most instances, the system will indicate the reason, which is usually one of the following:
Invalid Mile Status: Check to make sure that the mileage type listed on line 13 of the inventory screen is set to "Actual". Any other mileage type will not qualify.
Miles in Excess: The mileage may be too high to qualify for the selected service contract. Verify the mileage you have entered on line 13, as well as the "miles at sale" entered on line 7 of the F&I screen.
Incorrect vehicle style: Check the vehicle style selected on line 17 of the Inventory screen. If it is set to RV, watercraft, ATV, or "other", the system may not return any service contract plans.
Lastly, different service contract and GAP providers have different guidelines that may disqualify a particular vehicle or deal. Contact your agent for information regarding specific qualification guidelines.
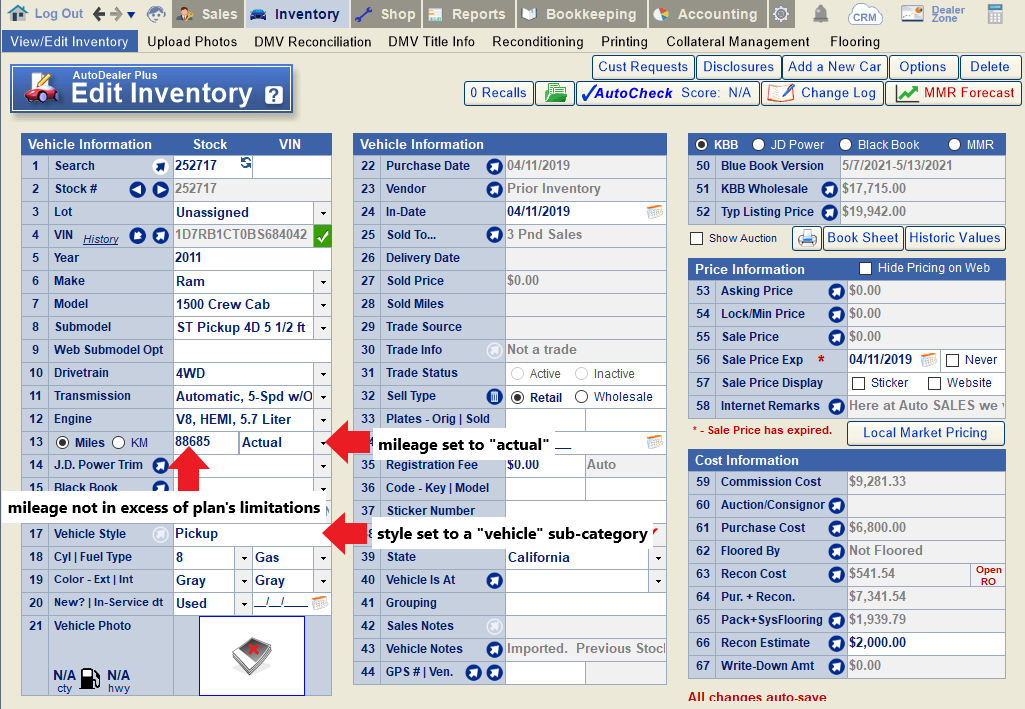
If you make any changes to mileage or vehicle style, click the "refresh" icon on line 1 of the Deal screen to refresh the VIN, and then re-attempt adding a service contract to the deal.
Why doesn't the "Total of Payments" on line 27 of the Deal sceen match the "Total of Payments" in the Truth-In-Lending section of the Retail Installment Contract?
If the Total of Payments figure differs between the Deal screen and the Retail Installment Contract, the most likely reason is that the deal includes a deferred down payment. While the figure on line 27 of the Deal screen does not include any deferred down payment(s), the Total of Payments in the Truth in Lending box does, per Regulation Z guidelines.
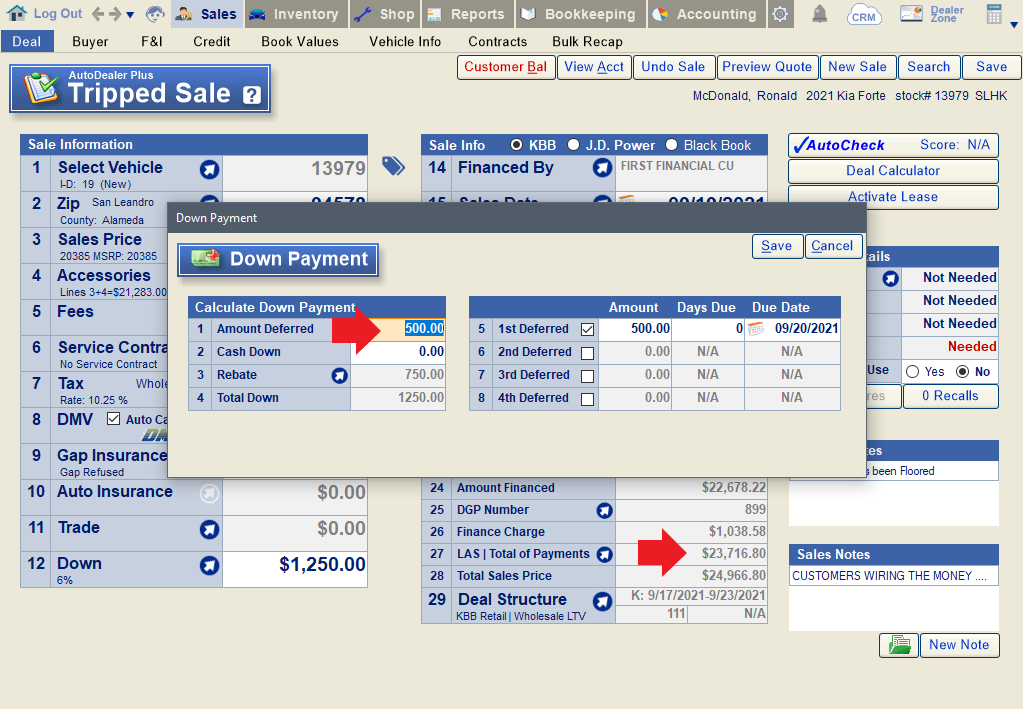
This deal includes a $500 deferred payment, which is not included in the "Total of Payments" calculated on line 27 of the Deal screen.
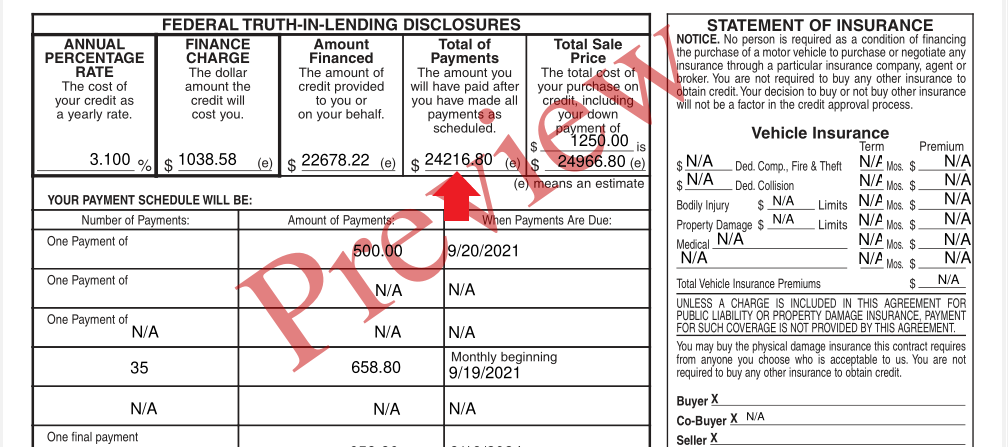
The 553 correctly includes the deferred payment in the calculation of "Total of Payments" for Federal Truth-In Lending Disclosures.
Why doesn't the down payment on my Retail Installment Contract match the information in the deal screen? (deals with negative trade equity)
When a deal has a trade-in with negative equity (the lien value is more than the trade value), this will effect the way the down payment is displayed on the retail installment contact.
In this example, there is a trade-in with a negative value (-$2000), plus a down payment of $3000.
In this case, the Federal Truth in Lending disclosures at the top of the retail installment contract will list the down payment as $1000 ($3000 minus the negative $2000 trade-in value).
The itemization will show the $5000 trade-in value, less $7000 for the lien value, for a net trade-in value of -$2000. Below that, the $3000 down payment is itemized, for a total down payment of $1000 ($3000 down payment - $2000 negative trade value).
Our second example demonstrates how the contract would print in a situation where the down payment does not exceed the negative trade value. In this case, we still have a -$2000 trade-in value, but the down payment is only $1000.
The Federal Truth in Lending Disclosures at the top of the retail installment contract will show a $0 down payment since the total down payment is negative ($1000 down payment - $2000 negative trade-in = -$1000 total down).
The itemization of the down payment will show a $5000 trade-in value minus a $7000 lien value for a net trade-in value of -$2000. Below that, you'll see the $1000 down payment. Since the total down payment is negative ($1000 down - $2000 negative trade-in = -$1000, the total down is listed as $0, and the remaining $1000 owed by the dealer to the lienholder on the trade is itemized above.
Note: The screenshots displayed above are from the CA LAW 553; some things may appear differently depending on your state and the exact retail installment contract you use, but the mechanisms of how the down payment is displayed and itemized on the contract should remain the same. For more information on why the contract appears this way on deals with negative trade equity, see this link from the CFPB (comment 18(j)-3) and this document from the AFSA (page 10).
Why don't I have access to the Auto Insurance field on the deal screen?
Why isn't the Contract Cancellation Option or Contract Cancellation Refusal showing in my Contracts list?